They have just launched the Open Home Foundation, which is a Non-profit Organisation, which will host the Home Assistant, ESPHome and related projects. This means that these projects can never be bought by another commertial company or orgaisation, and will always be free and open.
Nabu Casa will continue to support Home Assistant with its subscription service, which will fund continued development on the platform.
This is a usage note that collects together a bunch of information that was collected while working on a Grafana Dashboard for an IoT project.
The projects is using Grafana v9.4.9 and querying data in an Influx Database, using the Flux query language.
Getting Location values
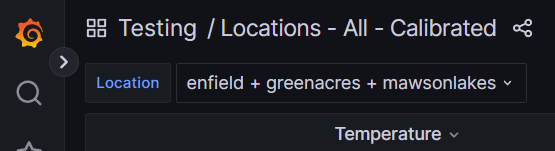
The data that is being collected is tagged with a string that describes the location of the sensor. This is separate to the name of the device (dev_id), and this was a deliderate choice so that the device could be maintained and possibly be replaced with a new one, and continue to collect data for a particular locatgion. (The new sensor would also have different callibration data.)
The following query in the variable definition will extract a list of the locations.
Notice that this query also selects out the range of the data to display as selected from the time range of the dashboard.
Selecting Location Values
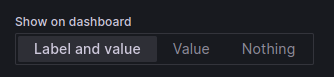
To allow the locations of interest to be selected on the dashboard as required, in the definition of the variable screen, select the “Show on Dashboard” option – “Label and Value”. This will automatically add the variable, possible values and selected values to the dashboard, and allow the user to selct between them.
Thanks
A quick thanks to Randall, from the PAE IoT Experimenters for providing the initial screenshot.
The following is a short list of open source software worth checking out for home automation and IoT. (There will probably be some posts on each of these in the future.)
Usually, a RaspberryPi has been the platform of choice for deploying this software. Due to the current shortage and difficulty of getting RaspberryPis at the moment, Andreas Spiess (the guy with the Swiss accent) has just posted a Youtube video comparing other options using second-hand mini-pcs.
Andreas has also got some older videos introducing IoTstack, linked on the IOTstack website.
Home Assistant
This software for gluing together and managing a lot of the commercially available IoT and Home Automation products available for the home. The software used to connect to these products (called integrations) have been developed by the Home Assistant community and is available as additional plug-in or library which can be installed as required. (See: https://www.home-assistant.io/integrations/)
IoTstack
The IoTstack software is a system for installing, managing and backing up a large number of other software services which may be required (eg. Home Assistant, plus web server, databases, file servers etc.)
Open Energy Monitor is a project based in Wales which has developed an energy and environmental monitoring system. They have an energy sensor (the emontx series) which monitors the current in up to four(4) channels, together with the AC voltage, in order to measure the power flowing through electrical circuits.
Current transformers are used, and are placed by clamping around individual wires, allowing the current in the wire to be measured without making any change or direct contact to the existing wiring.
The Open Energy Monitor store are selling their sensors as a kit, and one has been ordered with four current transformers. This will be paired with an already available Arduino UNO to allow for an evaluation of the monitoring software.
We are just after the power measurements for each channel to be reported via a serial connection rather than using their project specific radio (a 433MHz radio link).
All of the code that they are using (with and without the radio link) is available via their forum and github repository.
As we evaluate this system we will be posting the results here.
The Open Energy Monitor also has a good set of documentation on how the units work, how they have been put together, and more on the theory of energy monitoring using current transformers.
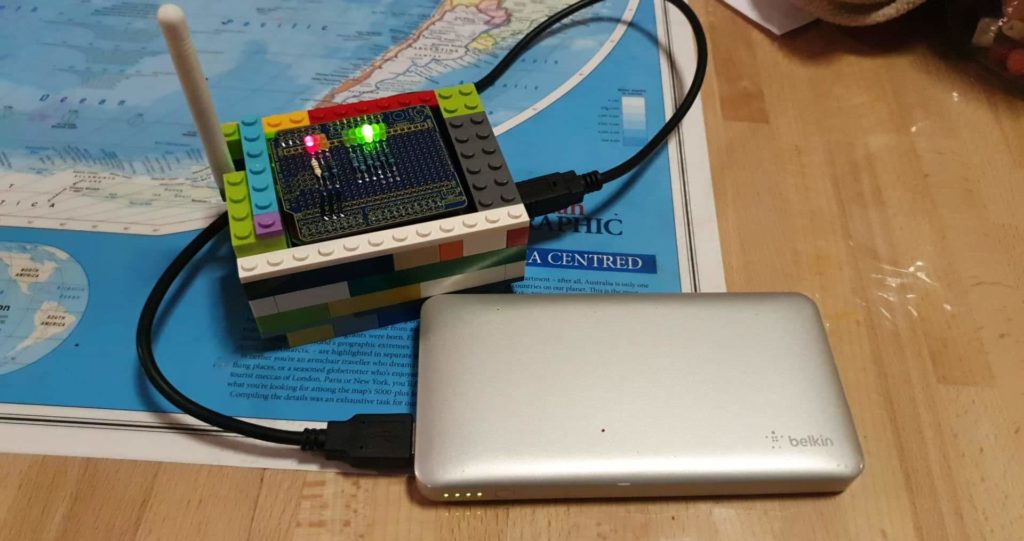
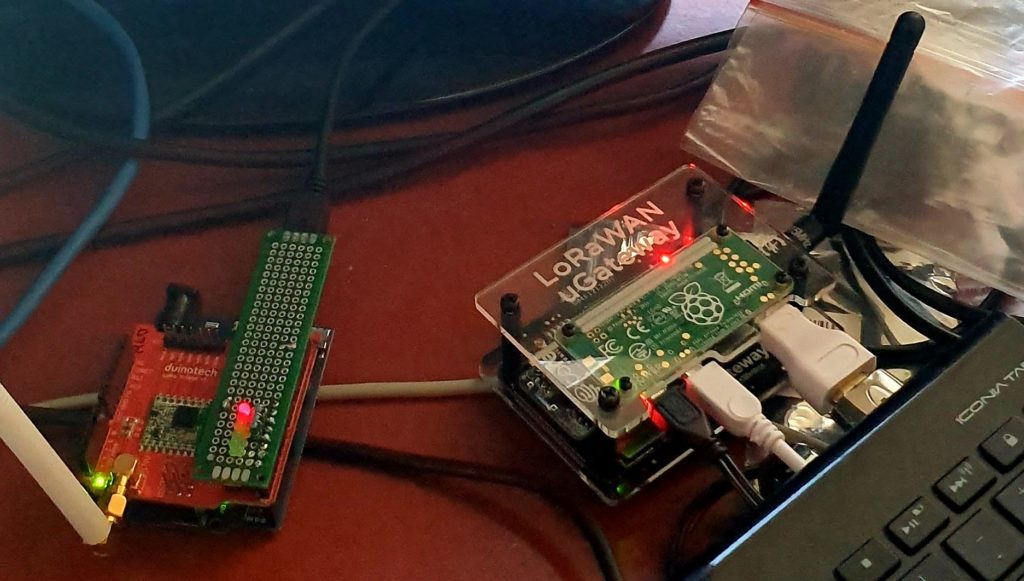
While the kids had the Lego out, I thought that I would pinch some pieces and build a case for my LoRaWAN node. Nothing fancy, random colours but enought to protect the boards from random knocks and bumps.
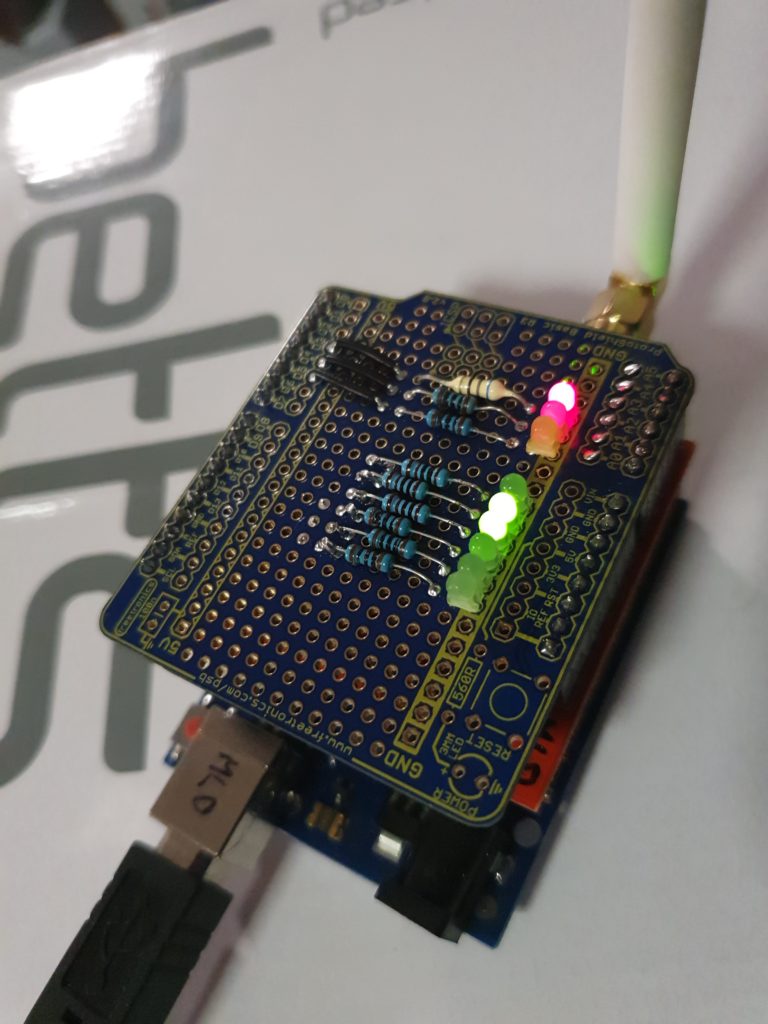
LoRa Node consisting of an Arduino Uno (bottom), Duinotech LoRa Radio shield (middle) and Freetronics prototyping board (top)
The following is a quick update on the construction of LoRaWAN node., which was perviously described here.
After the previous work and the messing around with the uneven Arduino pins, I ordered some Freetronics prototyping boards and continued with those.
With the first prototype, I had attached LEDs to the first two digital pins (D0,D1) which are also used by the USB Serial connection. These made them kind of useless for monitoring any status, but also interfeared with the Arduino sketch programming. Before a new program could be successfully loaded in this configuration, the board first needed to be removed. This got annoying very quickly, particularly when I enjoy having a fast development process.
In the next design I removed these LED’s and connected them up to the supposibly free and available digital pins (D11,D12 and D13). It appears as though the LoRa radio board also uses at least one of these pins out of the box, with configuration jumpers that use the others. If the configuration jumpers are changed, the software would also need to be changed. The board works as expected out of the box with the available Arduino libraries, so it would be a pity to mess this up. Also, the documentation on the boards jumpers, and their orientation isn’t the clearest, so it would be best just to leave this well alone.
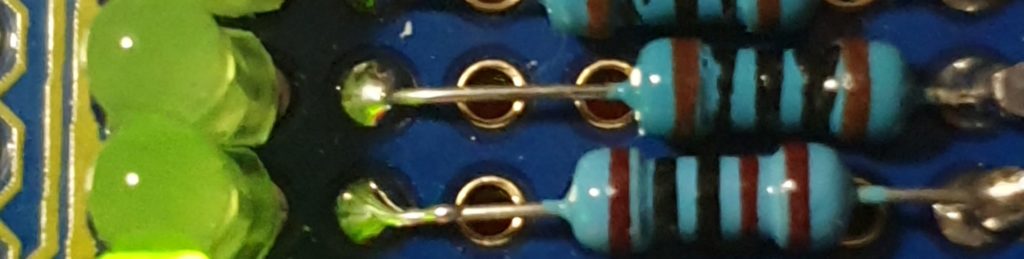
The remnants of this work can be seen on the bottom three resistors seen in the picture above. These resistors were connected with hookup wire underneath to pin D11, D12 and D13.
The Arduinio analog input pins, which were still unuised, can be switch to be used as digital outputs. The three LEDs that were connected earlier to the digital pins, were now connected to Analog pins A0, A1 and A2, with addional LEDs (with resistors, more about that sortly) to A3, A4, and A5. They are connected by more hookup wire underneath the prototype board.
Spot the difference.
A sketch was written to test the connected LED’s and was uploaded, without having to remove the prototype board first. This showed that everything was working as expected, except for one thing. The three new LEDs where significantly dimmer than the first ones.
The three new resistors I had grabbed quickly from my resistor box were 1K (Brown-Black-Black-Brown/Brown), rather than 100 Ohm (Brown-Black-Black-Black/Brown). This ment that the current through the LEDs was less, and hence their brightness was less as well. This has not been fixed in this prototype and probably wont be, although I could solder another suitably size resistor in parallel to the 1K ones to made the combined resistance close to the desired 100 Ohm amount.
The uploaded sketch was still contained the ability to set a couple of LEDs based on a byte of data received from the LoRaWAN radio. This was shown to work from The Things Network web, with the next step being able to drive this from custom software. Data from the LoRaWAN node is accesses via the MQTT protocol, and data can be uplinked to the node using the same method.
With assistance of the STEM Education resources from the Port Adelaide Enfield Libraries, I have been investigating LoRaWAN devices, how to build them and how they can be used.
There is more investigation to be done, but the node shown in the picture above is able to do the following:
Connect and Authenticate to a LoRaWAN network (The Things Network) via Over The Air Authentication (OTAA); and
Send data (Uplink) and Receive data (Downlink) via the LoRaWAN Gateway(s). (Downlink data is queued, and is received in a window after Uplink data has been received by the network. This reduces power usage in the node.)
The Node used was the Gragino Arduino Shield (or clone from duinotech)
The Gateway is the uGateway LoRaWAN from Core Electronics. Having a local gateway is not necessary if there is another one in the neighbourhood, within range of your node. There are currently no nodes in my area so an internal gateway was required for development and testing. The other option was to take the Node for a drive in the car after a development session, but this made debugging very tiresom, very quickly.
There are a couple of other useful tools worth mentioning.
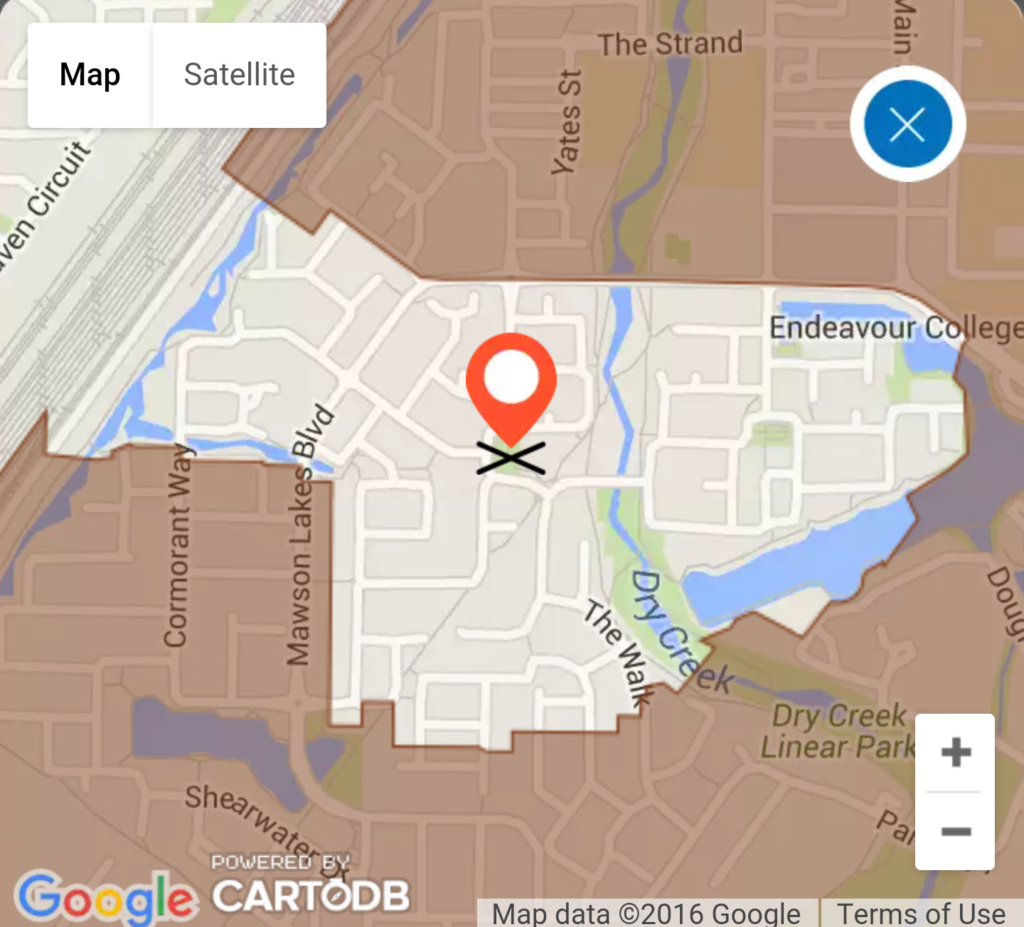
TTN Mapper is an Android application that will monitor your device on your smart phone, via The Things Network. It then used your phones GPS to log the position of your device. The result is that you can map the coverage of nearby gateways by using your LoRaWAN node and phone in a similar way to how Wireless Access points used to be mapped (WarDriving). This is useful for knowing where your nodes have TTN access, and where additional gateways might be required.
It’s finally arrived. Twenty years after being promised a community with a broadband infrustructure it has finally been delivered to the Mawson Lakes Parkview Village via NBN’s NFC infrustructure.
It would be interesting someday to get the details of what exactly happened, but the end result was that the early parts of Mawson Lakes had coax cable in the street, which the later parts didn’t. In addition to this, much of the earlier sections were also put on ‘pair-gain’ for their home phone which ment that the new ADSL technology for broadband over their phone line were also not available. Many homes opted for fixed wireless connections, which can be verified by the large number of wireless dishes on the roofs across the neighbourhood.
When we originally bought our property in 1998, it was with the promise by the developer that Mawson Lakes residents would have access to broadband when they moved into their homes. This was before the 2000 Sydney Olympics and the Optus vs Telstra cable wars, which saw large amounts of cable rapidly rolled out across Australia through this period, through to mid-1999.
The Mawson Lakes Foxtel Cable, now HFC Network Area
The developer Delfin, now Lendlease, had made an arrangement with Telstra to do the rollout in Mawson Lakes. When Optus decided to stop, Telstra also stopped it’s rollout nationwide, including Mawson Lakes, even though a separate cotract was in place. My understanding was that the contract commitment by Telstra Delfin was eventually settled out of court for an undisclosed sum..
While having waited so long for the internet service that had originally been promised, I there was happy enough to be able to pre-order the service when this option became available. This ment that finally there was some progress. The order progressed and was eventually booked in for the week before Christmas.
The installation almost happened without any drama whatsoever. A combination of the way the NBN has been designed (as a wholesale business) and the ISP, ment that not only did the process become incredibly frustraiting, but this frustration could easily have been avoided in several different ways, including not making a simple mistake in the first place.
Mistakes happen, this is a reality of life.
In this case, the serial number, or MAC address of the ISP supplied router had been entered incorrctly, presumably by the ISP. I have no way of knowing if this was indeed the case or not, as the NBN technical support person wasn’t allowed to directly talk to me (as I overheard on the second call out), but the problem was solved between the NBN and my ISP in the background while I waited. This is what happens when you pay peanuts for data entry. On the first visit the NBN installation was done and everything from their point of view was working as expected, so the technision left. The router was ment to self-configure, which it didn’t, so several calls were made to the ISP and a second NBN callout was eventually made four days later.
In the meantime, on the day that the NDN as provisioned, my perfectly functional ADSL service was disabled and the login removed. After several calls, I was able to get a temporary login setup for this service so the family could atleast have internet access over Christmas. ATt this point the problem with the NBN service had yet to be identified. A further call to the ISP was required as they then attempted to bill me for the temporary.
In sort, not only did I fail to get a working ISP/NBN service, but the existing functioning ADSL service was cut off, with no expectation given on when any of the issues would be resolved.
Amongst all of this rant, there are a couple of highlights. I can report that there are still some knowledgable tech support people around who know the systems well enough to fix an issue without following a script. They are rare though. I hope they are being paid enough.